I hadn't felt satisfied with the paper workings for ivy roots sample 7. so decided to have another go.
I wanted to find a way of representing the hairy texture of the ivy roots so I tore and ripped strips of cartridge paper and then distressed the surfaces with with the point of my old and blunt embroidery scissors before pushing and manipulating the strips onto a glued surface.
I used a white background to exploit the shadows created by sunlight coming from the right. The ivy leaves have a different texture and a waxy / shiny surface. I used scrunched up tracing and grease proof paper papers for this. The creases leave white marks which could represent the veins on the leaves.
Also Sian suggested some more work to explore further my paper workings for sample 5 - ivy clad ditch.
She asked if using smaller scale leaves would have inspired a different response.
I realised I needed a denser patterning with repeated shapes and negative spaces. I'd been too hung up on trying to achieve a too realistic image and need to kick start the right side of my brain into seeing the diverse shapes rather than leaves.
I tried them out on black and white backgrounds to play with the effects of daylight and the shadows created on the latter.
For the two samples below I used tissue paper folded into a concertina, cut into and then spread out unevenly removing and scattering some of the leaf shapes from their folds. Much happier with these!
I haven't used my sketchbook pages too much in this post as the focus is poor but added this one below to show the concertina workings in top right hand corner and the waxy ivy leaves worked on black and white backgrounds at the bottom of the page.
Wednesday, 23 August 2017
Monday, 21 August 2017
Chapter 4 continued
Having investigated the technical properties of my collection of fabric types in the first part of the chapter I've used knowledge gleaned to produce an experimental collection of edges which have been further developed into decorative bands.
I played around with different strip widths and edging effects depending upon the nature of the fabric. I really enjoyed this piece of work - lots of surprises which were exciting and inspiring!
Mix of natural and man made fabrics - please refer to the chart below
And more:
During my tutorial at Summer School Sian suggested I fray more samples and layer them for added effect. Really love these samples especially the silk muslin - sample 1. So beautiful.
See below:
And then fraying on the bias, layering, gathering and threading:
Close up:
Some of the samples took on a similarity to my research pages in the first chapter:
Close up:
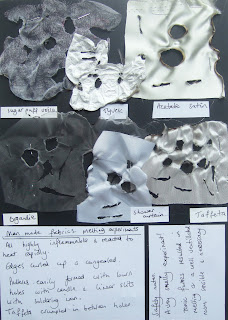
Finally I added some layering with strips of man made fabrics slashed or penetrated with a soldering iron:
It was important to observe safety precautions with these samples as melting these fabrics emitted noxious fumes [ I worked in a very well ventilated work space as well as taking care to prop the heat tool up carefelly to prevent accidents.
Distant Stitch Certificate Embroidery Module 5 Chapter 4
Fabric Investigation
This chapter asks that we start by making a collection of different types of fabric in white or natural colours and identify them in terms of the fabric type [fibre content] and description of their structure e.g. thick, thin, see through, stretchy etc.
I started with cottons, cotton loose weaves and even weaves.
Followed by Woollen and silk fabrics:
Man made fabrics:
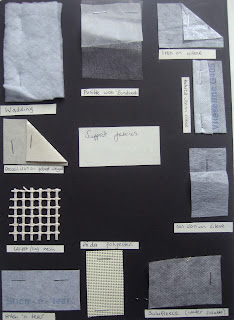
Support fabrics:
Nets:
The next task was to note how a selection from each category behaved on:
Experiments with burning [cottons]
This chapter asks that we start by making a collection of different types of fabric in white or natural colours and identify them in terms of the fabric type [fibre content] and description of their structure e.g. thick, thin, see through, stretchy etc.
I started with cottons, cotton loose weaves and even weaves.
Followed by Woollen and silk fabrics:
Man made fabrics:
Support fabrics:
Nets:
The next task was to note how a selection from each category behaved on:
- crumpling,
- comparison of hold or stretch along the straight grain or bias,
- nature of the frayed edge, on both the straight grain and the bias.
I made a chart to document these starting with cottons:
And silks:
And woollen:
And Man made:
Nets:
And last but not least Support fabrics:
Tricky to photograph but top headings should read rug mesh, Bondaweb, iron on Vilene, Solufleece, Decovil and Stitch 'n tear.
Here are some experimental samples - please cross reference with the chart above for more information.
Fraying the straight grain and on the bias.
Firstly cotton and silk:
And man made:
Experiments with burning [cottons]
Silks:
Man made:
Support fabrics:
Nets and woollens:
Wednesday, 9 August 2017
summer School 2017
Distant Stitch
Summer School 2017
This year I attended
the workshop entitled Identity led by Julia Triston, Textile Artist
and member of the Textile Study Group. We were asked to take some
garments which held a personal history or if we preferred, garments
with an unknown history e.g. charity shop finds.
This was a materials
led exercise. We were to explore our garments through deconstruction
by cutting up, tearing and unpicking looking closely at the features
we discovered and uncovered as we worked which included stitching,
loops, straps, embellishments, labels, fabric types, frayed edges
etc. We learnt to recognise character in our garments brought about
by their histories, wear and tear, laundering, storage etc.
We then
reconstructed the above to create a single or a series of fabric
collages.
I took 2 favourite
well loved and well worn sundresses which remind me of sunshine,
holidays, travel and the discovery of new exciting places. I identify
with these strongly. I love to travel and I love garments!
My purple linen
dress
Worn many times. It
has been stylish, practical, comfortable, hardwearing, colourful but
has recently started to wear away. Time to let it go!
My spotted cotton
sundress -
Has been exactly that - a sundress, worn on countless sunny
days but has needed darning and mending to extend it’s life but
when the opportunity arose to have it copied and another lovely dress
created just like it whilst visiting Hoi An, Vietnam recently I felt
I could finally let it go!
1. A feature of my
purple dress were panels joined in the form of tucks finished with
over locked seams which revealed layers of wonderful frayed edges when
unpicked and distressed. These were linear obviously but often gave
way to interesting undulating shapes formed through wear and storage.
I started to cut away lengths of the tucks and frayed edges and
placed them on a background provided by the right side of the fabric.
These along with the zippers from both dresses formed linear patterns
with beautiful frayed and textural effects. They developed into
linear tracks along the length of fabric and extended at various
lengths beyond the lower edge. I instantly linked these with journeys
made not only on holidays and travels but also the metaphorical
journeys we make through life. Journeys have been long, short,
adventurous, easy, relaxing, challenging, difficult, joyous, sad, and
some life changing.
I added strips and ‘peeps’ of spotty sundress to link the garments and the theme plus a strip of wrapped sari length given to me by a friend from her own travels plus some carefully placed buttons to embellish and pick up on the shapes and colours in the spotty dress. The care label [worn and discoloured] demonstrates wear, tear and care.
Tucks finished with over locking were unpicked to reveal gorgeous frayed edges beneath.
2. I’m really
pleased with the ‘bikini’ top! I played with this to get away
from the linear patterns of my main piece [not especially inspired by
travelling in this case].
 The initial right hand side was constructed
out of the purple fabric joined to a strip of the interfacing and
turned upside down with inside out seams frayed and distressed. It
didn’t become bikini like until I added a strip along the top edge
secured with running stitch; I wondered what would happen if I
gathered it and was delighted to watch it take on a 3D bra shape!
I felt it needed
another half so I improvised with more fabric pieces turned to fit,
bias binding, ‘peeps’ of dotty sundress, strips of wrapped sari
length, beads and carefully placed wool pompoms to pick up on shapes
of the dotty sundress. I love the irregularity and the beautiful
sweeping shape of the ‘bikini’ when the two sides joined
together. Certainly not for wearing – just a bit of fun!
Beautiful textures and fray!
3. Spotty sundress
strip. Shirred panel cut and rejoined, torn seams, bits of zips,
braid, label, beads and studded tape. This all came together very
quickly. Short journeys.

4. This piece was inspired by the beautiful sequinned ribbon brought back from my friend’s trip to India which fitted under a strip of lining from the spotty sundress over which a zip happened to fit perfectly. I’ve added a buckle, peeps of spotty sundress and 2 overlocked strips from the purple dress plus a strap to finish the edges. The whole piece with protruding ribbon reminded me of the old steam trains we caught
across Rajastan in 1987. Another fantastic journey.
All three together now!
I really enjoyed Julia's workshop. Thank you! I blogged this as I like to have a sense of completeness before I dive back into coursework. As always lots of ideas cropped up for this when I got home so I decided to share, the class was so lovely and I miss the feedback!
Subscribe to:
Comments (Atom)


