Friday, 9 September 2016

Chapter 8 revisited

I have made another forest floor motif to add to those in chapter 8, I already had the embroidered N motif and the maple leaf / american oak but I wanted to add a similar motif featuring the enhanced letter Y. The N and Y represent the initials for New York whilst the maple leaf and american oak represent the forest floor. All together I want them to stand for New York in the fall and how this works will become clearer soon as I begin to work on my book structure.

Y letter motif

Y letter motif

Monday, 25 July 2016

Chapter 10. Book–type structures to try out.

This chapter is in preparation for the final project for this module, we have to make a finished item developed from ideas we have developed so far, in the form of a book or port-folio-type structure.

We have to think imaginatively as books can come in all shapes and forms but we need to consider some mock-ups of our ideas and how our embroidery techniques could be incorporated upon at least one embroidered panel within the structure.

I haven’t used my best hand made papers as I need to keep them for later but I found some yellow and purple card and papers  to practice with. Although these were great for getting to grips with the techniques I decided I wanted to use some more interesting papers for effect.  Along with less precious hand made papers I found some  old ones I’d used for transfer printing which were great – never throw  anything away!

I’ve included both sets here so it may look as if I’ve repeated myself but I had loads of fun working through this chapter. This is new to me and I’ve always wanted to learn how to make books so I seized the opportunity full on!

1. Pamphlet books. These are simple books made by folding pages and inserting them into a firmer outer cover. Each set of pages is known as a pamphlet and is held in pace by stitching. These are hand stitched using 3 or 5 holes depending on the size of the book. Accurate folds are made with the aid of a bone folder and the holes for stitching accurately measured and pierced to ensure that the cover and pages are in alignment.
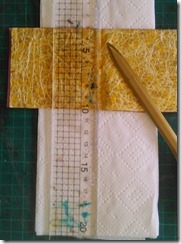
bone folder preparing pamphletspamphlet stitch

book pamphlet

2. Multiple books have been made from a longer outer cover to accommodate more sets of pamphlets in the folds. It was interesting to play around with different textures of paper.

multiple books

3. Here the outer cover and pamphlets are in the shape of a leaf and have been secured by machine stitching.

maple leaf

4. Extra folds in the spine allow for insertion of extra pamphlets

differently folded spine

5. The addition  of  an external spine with cover and pamphlets  secured by thread or ribbon

added spine

6. Decorative stitching has been used to secure the pages. Again accurate folds and placing of the holes for stitching are necessary. A fold adjacent to the stitching allows for the book to be opened easily. I was interested in the edgings we looked at in a previous chapter so experimented more with this on the right hand sample.

dec stitching 2

7. These books have been made out of 2 flat covers inside which the pamphlets have been secured with a decorative chain stitch which weaves horizontally across the spine. I love this technique and spent extra time on it to make some books from some precious collaged boards I’d already made. I use some machine wrapped threads to add colour and texture

chain stitch

8. Pamphlets secured by stitching into the spine

stitched spine

9. Pamphlets turned into books in the absence of a cover by using strips of paper glued in place and stitched in place as before and incorporating the strips of paper

strips of paper binding

10. Variations on a theme – One book with stitching into the spine [left] , exposed spine and pamphlets stitched and woven together [centre].  I made the one on the right at Summer School about 4 years ago, the pamphlets are stitched  individually and then needle woven together. In all three  ends of thread are left on the outside and beads added.

beaded

11. Multiple book with cover and pages joined with blanket stitch as separate entities and then brought together with insertion stitch. Love this!

insertion stitch books

12. Unusual bindings . Left to right: needle woven sticks, rubber band with it’s ends held in place by stiff card at the back and single stick all used with an exposed spine.

unusual bindings

13. Pamphlet stitch used to incorporate sticks at their centre with a cork base and button fastening on the left and same book opened up on the right

book on a stickbook on stick open

14. Concertina book. Long piece of paper folded in concertina fashion and two ends glued to cover. It folds in nicely or stretched out as shown.
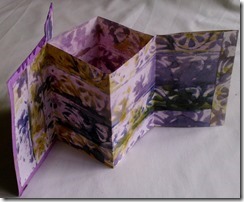
concertina

15. Clever folding and cutting. An A4 sheet has been folded in half  lengthwise and then across the length three times before being cut along the centre as shown.
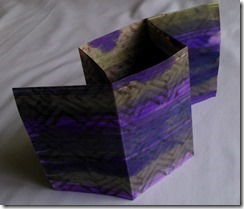
folding and cutting

16. Pages threaded together with beads to separate them and hung horizontally

hanging book

17. Wrap around book and experiments with closures

wrap around book

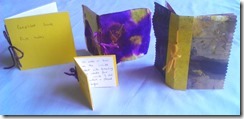
17.  The complete set!

complete set

Wednesday, 27 April 2016

Stitched textiles and accessories. Open House Hummingbird Studios 2016

This year I am taking part in the Open Houses as part of the Brighton Festival and have written this artist’s statement to add to my blog.

I have a lifelong fascination with beautiful fabrics, threads and colour. During my childhood I was surrounded by creativity with my mother, grandmother and aunt all accomplished needlewomen producing gorgeous pieces of stitching, knitwear, artwork and poetry.

My mother taught me to stitch and use a sewing machine for my first garments as a child but my love and obsession for embroidery developed much later. I started by enrolling at a machine embroidery class where textile artist Wendy Dolan supported me as I developed my own personal style. I then went on to experiment with a mixed media approach with textile artist Kim Thittichai. I am currently studying for a City and Guilds Level 3 Certificate in Embroidery with Distant Stitch, a distance learning school led by textile artist Sian Martin.

You can follow my coursework on this blog if you wish, this is an example of a finished piece of coursework - a headpiece constructed of machine embroidered wrapped yarns with beading detail

image_thumb1

I have always been fascinated by the beauty of nature and floral shapes and love creating deep textural and lacy effects. The idea of making something beautiful out of articles which have outlived their original function is another strong factor. I'm constantly fascinated by the diversity which can be achieved through textile art and the experimental nature of contemporary embroidery techniques

I have exhibited in the Brighton Festival Open Houses for several years and have enjoyed making jewellery, bags, gloves, books and other accessories. I love the challenge of a developing project, problem solving along the way followed by the thrill of a finished project.

I have added a few examples of the work to be shown in the Open House below:

Evening bag made up of hand dyed silk with machine embroidery to the flowers, strap and finish to the bag itself:

image_thumb2

Evening wallet or vanity bag. This is shown here against the original artwork from which it was inspired, this has been printed onto silk with applique and machine embroidered detail:

hand-printed-and-applque-wallet_thum

Machine embroidered brooches

heart-brooches_thumb

Crocheted belt with vintage ribbon detail

crocheted-belt-with-vintage-ribbon-d

A selection of crochet and machine embroidered belts, necklaces and brooches:

080_thumb

Hand crafted notebooks:

hand-crafted_thumb

Detail of the above showing my own collage work and machine embroidered hummingbird motif:

handcrafted-4_thumb

Customised sketchbook with monoprint and collage:

b-c-11_thumb

Book covers using my own watercolour printed onto silk and machine embroidered / hand stitched detail:

cloth-b-c-2_thumbcloth-b-c1_thumb

Hand crafted notebook with monoprinted and machine embroidered panel and beaded detail:

heart-book-cover-2_thumb

A selection of hand knitted corsages:hand-knitted-corsages_thumb

To contact Carrie email - carriedonohoe@hotmail.co.uk

http://www.wendydolan.co.uk/

http://www.kimthittichai.com/

http://www.distantstitch.co.uk/

Monday, 1 February 2016

Chapter 9

Whilst handmade paper edges have wonderful ragged and organic edges it is sometimes desirable to have a neater and finished edge for a front page or a cover.

It was therefore our task to look into stitched edges bearing in mind our research and lettering ideas.

For this chapter I needed to find out how to get a clean fold especially as my paper is handmade. To do this I needed to score the paper. I measured and marked where the fold belonged and whilst holding a ruler along the marks I ran my bone folder along the ruler hard enough to make a pressure score or groove. Without moving the ruler I folded the paper up by running the bone folder on the outside of the fold, pressing it harshly against the ruler.I then removed the ruler and and flattened the fold by running the bone folder over it. [ details from Cover to Cover by Shereen La Platz]. This worked brilliantly and produced a beautiful neat fold.

First thoughts about stitched edges:

thoughts on stitched edges

Samples 1 and 2:

text samples 1and 2

Sample 1

edge 17

And reverse:

reverse 17

Sample 2

edge 1a

And reverse:

edge 2a

Sample 3

edging 3atext further edges

And reverse:

edge 3a reverse

I used some spare white handmade paper produced earlier in the module but I appreciate that sticking to my colour scheme would have been more effective.

It was aslo interesting to see the right and reverse sides.

Sample 4

insertion stitches 1text inserted  stitches

I really like the effects of these two inserted stitches [beaded and threaded] when they decorate the folded page:

beaded insertion uprightinsertion threaded upright

Sample 5

A combination of machine and handstitching – beautiful together.

edging