It is possible to
make an embroidered lace using soluble fabrics. I think this is one of the most wonderful and serendipitous of techniques in the world of stitched textiles!
I have made a series
of technical samples trying out a variety of dissolvable fabrics to compare results. I've used these materials before and always loved them but I'm intrigued to try out a wider range.
Sample 7.1
Each piece is just 3 x
3 cms in size and I have used the same free machine embroidered technique for each to
enable me to compare the results and any differences in the
dissolvable fabrics used, depending on their individual
characteristics. It’s essential that rows of stitching connect to
prevent unravelling.
I have recorded my
observations below, the differences were subtle but could make a difference to specific pieces of work. Please zoom in for my comments:
7.2 Samples of
soluble lace using different stitch methods.
I have now produced a series of samples using my favourite soluble fabric
– I have chosen Solufleece cold water soluble.
I
have stretched the fabric in an embroidery hoop and using machine
stitchery I have produced a series of 3 x 3cm samples including the
following criteria. Needle
size 90.
Normal stitching
Free stitchery using an embroidery foot with feed teeth out of action
Very open effect
Very dense effect
Only one direction
In opposite direction
In curved shapes
Straight stitch
Any swing stitch
Cable stitch
Whip stitch
Metallic thread
With trapped bits of fabric or threads.
Form a 3 dimensional shape
The three following images are of my samples worked [a] within the hoop and then [b] pinned onto polystyrene ready for rinsing and [c] finally after rinsing. I’ll talk about each in turn and compare the results after rinsing.
[b] pinned onto polystyrene ready for rinsing:
And finally after rinsing:
I’ll talk about each in turn [the samples are numbered] and compare the results after rinsing.
Sample
1: Variegated
thread on top and turquoise on lower bobbin. Feed dog engaged.
Tension normal. Initial square of straight stitching then straight
stitch in one direction ensuring that stitches connect at the edges.
Rows of scallop stitching in one direction only. Then cable stitch in scallop
style to finish using space dyed linen thread on lower bobbin with
looser tension
and
worked blind.
Dense stitching.
After
rinsing: Dense and textured finish with wave like patterning
highlighted by the cable stitch. Size
unchanged. Really love this one, the variegated thread and the scallop stitching gave beautiful detail and texture.
Sample
2: Variegated
thread on top and turquoise below. Feed dog disengaged. Tension
normal. Straight stitch worked in free circular pattern around the
outside and then filled in ensuring that all stitches connected at
circle edges. Cable stitch [as
before]
to finish with space dyed linen thread in lower bobbin and worked
blind.
After
rinsing: Lovely well formed circles of various sizes. Size
unchanged.
Sample 3. Feed dog disengaged. Variegated thread on top and turquoise
on lower bobbin. Free wide zigzag worked in vertical lines and then
horizontally in sideways zigzag over the top. Dense stitching.
After
rinsing: Surprising result with wonderful loose
and irregular texture. Now measures 3 x 7 cms. Love
this result!
Sample 4: Turquoise variegated thread on top and turquoise below. Narrow zigzag
grid filled with free circular stitching.
Apricot variegated added via lower bobbin using whip stitch to add
definition. Dense stitching.
After
rinsing: Dense areas of
textural
stitching
alongside circular
lacy patterns. Size unchanged.
Sample 5. Variegated turquoise thread on top with turquoise in lower bobbin.
Feed dog disengaged. Free stitching in repeated circular layers until
the shape starts to distort in the centre.
After
rinsing: Loose
circular rows of stitching in places with raised area in the centre
and upturned areas. Looks like a 3D shape but not expected! Size half
a cm smaller. So exciting! Love
this result!
Sample 6.
Variegated and turquoise threads as before. Feed
dog disengaged. Initial
free
concentric
circular stitching in straight stitch then
circular patterning from each corner to the centre. Loose effect.
After rinsing: Circular patterning has stayed in place and size
unchanged.
Sample 7. Apricot variegated thread on top and turquoise below. Feed dog
disengaged. Whip stitch. Figure of 8 loopy stitching.
After rinsing: Lovely loopy and loose effect with texture created
by the whip stitch. Size unchanged.
Sample 8. Orange thread on top, royal blue below. Feed dog disengaged.
Zigzag grid worked and repeated.
After
rinsing: Irregular
grid effect, spirally and loose around the edged. Size 3 x 4.5 cms.
Sample 9. Orange and royal blue threads as before. Feed dog disengaged.
Narrow zigzag worked in an irregular grid. Finished with cable stitch
with orange stranded cotton on lower bobbin.
After rinsing: Looser and rounded effect of zigzag, cable stitch adds
definition and strength.
Size 3 x 3.5 cms.
Sample 10.
Snippets of blue cotton organdie and orange felt held in place at
random
by wooden cocktail stick as a narrow zigzag grid is worked. Orange
thread on top and turquoise below.
After rinsing: Grid maintained with snippets of fabric secure. Lovely
blending of fabric bits and stitching. Size unchanged.
Sample 11. Trapped threads [space dyed linen] held in place by cocktail
stick as random circular stitching worked.
After rinsing: Lovely lacy effect with threads loose around the
edges.
Size unchanged.
Sample 12. Royal blue thread on top and orange below. Feed dog disengaged.
Whip stitch. Base grid of straight stitch over worked by rows of
zigzag worked vertically only.
After rinsing: Tight spirally effect, looser at the ends. Size 3 x
4cms.
Sample 13.
Variegated and turquoise threads worked
in straight and zigzag stitch base. Cable stitch added in turquoise
Madeira Glamour metallic thread. Dense stitching.
After rinsing: Gorgeous texture, dense and loose textured areas. Size
unchanged.
Sample 14. Royal blue and turquoise threads. Feed dog disengaged. Whip
stitch. Wavy zigzag patterns worked horizontally. Central vertical
line added to secure structure.
After rinsing: I rinsed very briefly to purposefully leave some of
the soluble fabric in to enable me to mould a 3D shape. Looks like a
sea creature!
7.3 Soluble
lace based on sea and sky drawings
The task here is to work a series of samples using any dissolvable
fabric based on my drawings made in chapter 1.
The brief is to note the type of mark and rhythm in the drawing, to indicate the
type of threads and stitch to be used which will inform the rhythm of the stitching. I have uploaded the original drawings or mark making followed by the sample prior to rinsing and afterwards. I've dealt with each one individually. All worked on Solufleece.
7.3.1
The mark making in the drawing indicates the movement of the waves
which slant diagonally upwards from left to right. The rhythm is one
of gentle movement in the same direction.
I have, therefore, worked a diagonal and horizontal grid in free straight stitch to support my stitching. Tension normal. Feed dog down. Royal blue thread on top and turquoise below.
Then sideways zigzag with loosened lower bobbin for whip stitch worked diagonally and upwards across the grid.
Snippets of space dyed blue cotton organdie and printed orange chiffon held in place with a cocktail stick and held in place with more sideways zigzag.
On dissolving the sideways zigzag gives the impression of movement and rhythm whilst added fabric bits add texture and a sense of depth. Lacey stitching suggests light reflecting on a watery surface. I’m very pleased with this.
7.3.2
The mark making in this drawing suggests a rhythmic ripple effect
with broken circular lines radiating from the top left centre so I’ve
worked a loose semi circular grid in narrow zigzag as a base ensuring
that all the ends connect with a border. Turquoise variegated thread
above and turquoise below.
Spaces between grid worked in straight stitch in the same curved directional fashion.
Narrow zigzag with variegated apricot thread to lower bobbin [whip stitch] worked in circular shapes between grid lines to accentuate rippled effect. Metallic turquoise added to lower bobbin for whip stitch to add sparkle to water surface.
On dissolving the rows of straight stitching have separated in places
which adds to the rippled effect and a sense of movement and volume:
7.3.3
I started this sample with a loose horizontal grid across the lower
half using straight stitch which joins the upper section where the
grid becomes circular in nature. Tensions normal. The rhythm of this
drawing was soft and undulating representing the clouds and seascape
by Joseph Mallard William Turner. Beautiful!
I’ve used royal blue on upper and lower bobbins which on this occasion is a departure from the original colour scheme and inspired by my drawings. I have added more stitching in the royal blue in narrow zigzag across the top merging into a vermicelli style pattern across the lower half. I’ve added orange on top with whip stitch to add texture.
A lovely lacey effect on rinsing and I'm really pleased how the vermicelli has stayed in place. Next time I would find a way to disguise the grid!
7.3.4.
This is based on a set of drawings using several layers namely
Inktense sticks and pencils with water or oil paint sticks with
pencil crayons which altogether give a denser effect.
In the lower section I worked a close horizontal grid using straight stitch and a wider grid across the upper section. All connected. I then worked overall spiral shapes in apricot and teal which were overworked in dark teal in narrow zigzag. This was finished with cable stitch in apricot stranded cotton over upper half and crewel wool in teal over the bottom half – both in narrow zigzag.
The stitching has shrunk a little following rinsing and although the result was dense it was still lacy as suggested by the drawings:
7.3.5
This is another drawing with several layers of colour [oil pastels,
water and then inktense sticks] but suggestive of a sunset over water.
The mark making is horizontal with a rhythmic sense of linear
movement across water and sky.
Basic grid in turquoise on upper and lower bobbins worked horizonally across the whole sample connecting to outer edge. Tension normal.
I then worked in the same turquoise in free machine sideways zigzag back and forth to ensure the stitches connected albeit loosely.
For next layer teal thread worked in same way back and forth but with snippets of space dyed scrim stitched down to add texture and depth.
Apricot variegated thread across and just above the ‘horizon’ in same fashion with turquoise on lower bobbin and to finish a dark rust thread added to add a tonal quality to the sky.
On dissolving a lovely horizontal and lacey effect with undulating
waves resulted which could be manipulated to suggest depth and
movement.
7.3.6
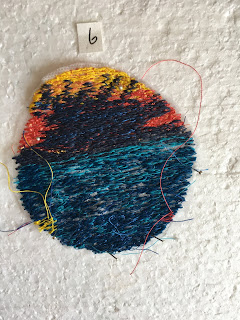
This is my favourite of the research artwork. Oil pastels and ink
resist. I love this drawing as I tend to do much better if mark making requires just a suggestion.
No preparatory grid this time as I wanted to see if I could
get the stitches to connect and support themselves.
Again the mark making moves rhythmically and horizontally across water and sky.
I started in yellow with a variegated yellow on the lower bobbin in free style sideways zigzag.
Then apricot with variegated yellow underneath. I then added dark teal through the yellow and apricot in same sideways zigzag through to the lower edge and turquoise over this lower half, with the addition of a metallic royal blue on top bobbin to add highlights to the darker area.
Finished with a little bit of yellow and apricot in the corners. No grid but stitching quite dense, hopefully the stitching will be looser on dissolving? I'd also worked this in a small round hoop when it probably needed more space.
And closer up:
This resulted in a lovely loopy and rolling sea with a tighter texture across the sky. Pleased with this.
7.3.7
I decided to have another go at this last sample! I wanted to see if I
could achieve a different result by adding snippets of fabric
horizontally across water and sky. The drawing suggests reflections
in a paler blue across the water.
I used the same zigzag stitching the same groups of colours adding in
strips of space dyed blue cotton organdie across the water and
monoprinted apricot chiffon across the sky with a little added to the
water.
This
resulted in a less lacey effect but seemed to capture the rhythm of
the water apparently
moving
across the sample.
Equally
pleased with this!
After rinsing:
And close up:
7.3.8
I was really pleased with first of my samples in exercise 7.2
featuring the free scalloped stitch
and equally intrigued by the lozenges which I’ve worked in the
embroidered piece 6.3.
I wanted to see if I could recreate the marks and rhythm present in
this frottage sample in ch 1.
I’ve
worked a regular grid using
a narrow zigzag in my turquoise variegated thread. I‘ve then added
some lozenge shaped fabric pieces and secured then quite randomly
using a scalloped [stitch feed dog engaged for this]. I’ve finished
it with the addition of the scalloped stitch but worked in cable
stitch with space dyed cotton perle on the lower bobbin.
I love this result, after dissolving it can still be seen as lacy
but has a firmness brought through the fabric pieces. Lovely rhythmic
feel. I love the textured effect of the cable stitched cotton perle
This has been a wonderful set of experiments, I’ve worked with
soluble fabrics before but really loved the surprising outcomes
achieved here. It seems the possibilities are endless!


