The proposed topic for this next project is collections.
My immediate reaction was to consider the collection of antique lace bobbins which belonged to my aunt with which she worked beautiful pieces of handmade lace.A small selections of my lace bobbins:
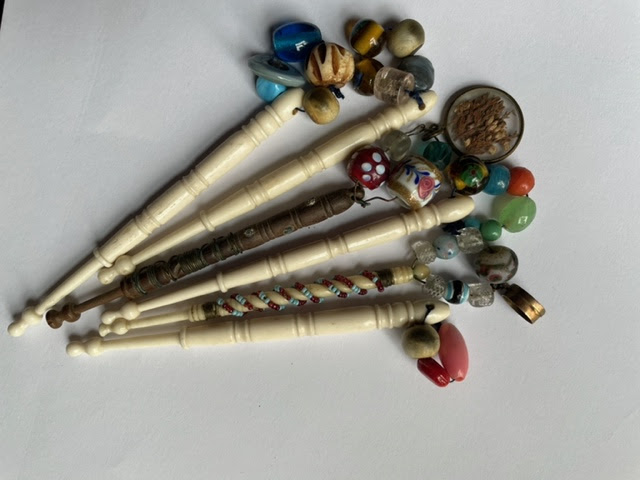
.jpg)
.jpg)
I really loved the above and playing around with the bobbins to find pleasing patterns but then came to realise that these are beautifully worked in fine crochet! I needed to think again!
I still had plenty to chose from and kept coming back to this piece, given to me by my aunt:

It originally came to me in a frame with a tiny photo in the centre of my aunt with her sister [my mum] and her brother. Delightful.
.jpg)
I considered interpreting the lace through cut work, I needed to transfer the design onto a suitable fabric perhaps cotton organdie [ as it doesn't fray]. Unfortunately the transfer pen did not give a clear enough outline from which to work. I persevered with the cotton organdie and decided to trace the motif onto tissue paper and machine stitch through to the fabric. Having removed the tissue paper I worked a running stitch around the edge of the motif. When I reached the bars I took the thread across the space 3 times without catching the base fabric and then adding a buttonhole stitch to cover the bars.
A further 2 rows of running stitch were added to the interior of the design before I added further buttonhole stitch closely over the outlines working the stitches to fit the shape of the motif.
I love the raised effect achieved by working in this way and the twisting of the buttonhole across the bars.
Very pleased with this but worked earlier in the project. The photographic image of this image will be included as part of the altered photo concept but I will need to consider how to incorporate this into the finished piece at a later stage.

Moving on I felt I'd like to include a vintage but altered photo relevant to the children but in keeping with the history of the lace. The photo below seemed perfect, my aunt and mother playing as children in the farmyard where they were born and raised. I wonder who took this photo to capture this precious moment in time, it would date at around 1932 or thereabouts. I found it in the memoirs written by my Aunt. What a wonderful legacy she has left and such a gift for me as love to use these in my artwork in the form of story telling.
.JPG)
I decided to experiment with printing the photo onto a piece of cotton organdie. I needed to prepare the fabric with a colour fixative to prevent fading for which I
used Rit ColourStay fixative. I have an Ink jet printer and used the freezer paper method to print the
image onto the cotton organdie - with a good result. I also wanted to capture the image of the girls in
stitch by working with free machine embroidery on a sheer fabric. To achieve this I traced the image
onto tissue paper and using a hoop to secure a piece of silk crepeline (which is a very fine pure silk
fabric with a stiffness to it which I liked for ease of working on this occasion). I was able to stitch
through the tissue paper which was then gently torn away to reveal the stitched outline.
I stitched over the image a second time to strengthen the line and have left some of the trailing threads in situ as they give a wonderful sense of movement. I'm pleased with the effect of the images of the girls and the lace showing through the layers facilitated by the sheer quality of the cotton organdie and suggesting the passage of time:
Image printed onto cotton organdie:

Traced image on tissue paper:


Cut out girls:

Layered composition:


At this stage I discussed my ideas with Sian Martin and members of The Stitch Textile Artists Group
via a zoom meeting. Sian suggested I incorporate the layered elements into a girl's dress.
This immediately resonated with me given the beautiful dresses worn by the girls which held opportunities for hand stitched detail. I decided to develop the above piece into a dress bodice and then consider ideas for embroidered detail on the back of the bodice and on the skirt. Ideas started to flow through our conversation - text along the hem of the skirt to reflect the poetry composed by my aunt and perhaps eyelet embroidery to adorn the back of the bodice and a sash.
I researched and found an ideal dress pattern via Etsy from The Freckled Pear Vintage Kate dress:

This pattern and instructions came as an instant pdf downloaded online. Perfect!
Given that my printed image had been developed from an A4 image I needed to adjust the pattern accordingly to accommodate it into the dress bodice.
Very excited now! Final layered composition:
I decided to place the cut out photos of the girls onto the base fabric rather than on the top as previously shown.
I used a cotton lawn as a base fabric for the bodice front and set about putting together the layers:
- paper girl cutouts and lace fragments were applied to the background using Bondaweb followed by
- the machine stitched outline of the girls
- and finally the printed image laid over the top.
I was then able to use my modified pattern piece for the front bodice to cut out my completed design.
I then applied the bodice lining ( white cotton lawn). With right sides together I aligned the bodice front to the lining and stitched the seam. All that remained was to clip the seam and understitch the seam allowance to stop the lining from rolling towards the right side of the garment.

Now the bodice back, skirt and sleeves. I plan to use the base cotton lawn as before but overlaid with silk crepeline for it's softening effect but also for it's transparent but matte finish which will compliment the bodice front.
I considered using elements of the lace doilly motif to form a collar but decided that it was too fussy and detracted from the layered effects I'd already put in place.
My attention then turned to the bodice back. It occurred to me that the hand stitched motif might work very well placed centrally on the back, couched in place onto the base cotton fabric with a layer of silk crepeline to soften it (represented by tracing paper here):

I made up some mock up dresses to help me visualise and therefore balance my hand stitching along the hems of the sleeves and lower front bodice with more eyelet embroidery cascading down and across the dress front. I'd like to add hand embroidered text ( my Aunt's poetry) along the dress hem with the addition of a sash embroidered in the same way:

Experiments with eyelet embroidery and various threads as below:

Research into which hand embroidered stitch I'd use for the text was my next task.
Stem stitch was my favourite as it offered both a softness and fullness of line; I looked at ways of
applying the stitching to the dress hems and the sash. I tried a layer of sheer ribbon with the base cotton and then the ribbon plus crepeline but both finished with an untidy back of work. The winner was water soluble fabric with a the shape of the letters drawn on ( to guide my stitching)with strip of ribbon fed through on top and supported with a small embroidery hoop. On completion the water soluble fabric was washed away and the ribbon and stitching allowed to dry. The ribbon and completed line of text was then hand stithed into place along the hem of the dress.

Text in place worked along the hem of the dress i.e. the cotton lawn under layer. I also decided to make use of the silk crepeline selvidge along the hem edge - a lovely neat finish for the outer layer.


.jpg)

Teach Yourself Embroidery 1938

And Embroidery by Good Housekeeping 1981:


No comments:
Post a Comment