Sunday 31 December 2017

Module 5 chapter 7 Tactile Contrasts

This chapter involved making an experimental sampler using different fabrics in different manipulative ways.
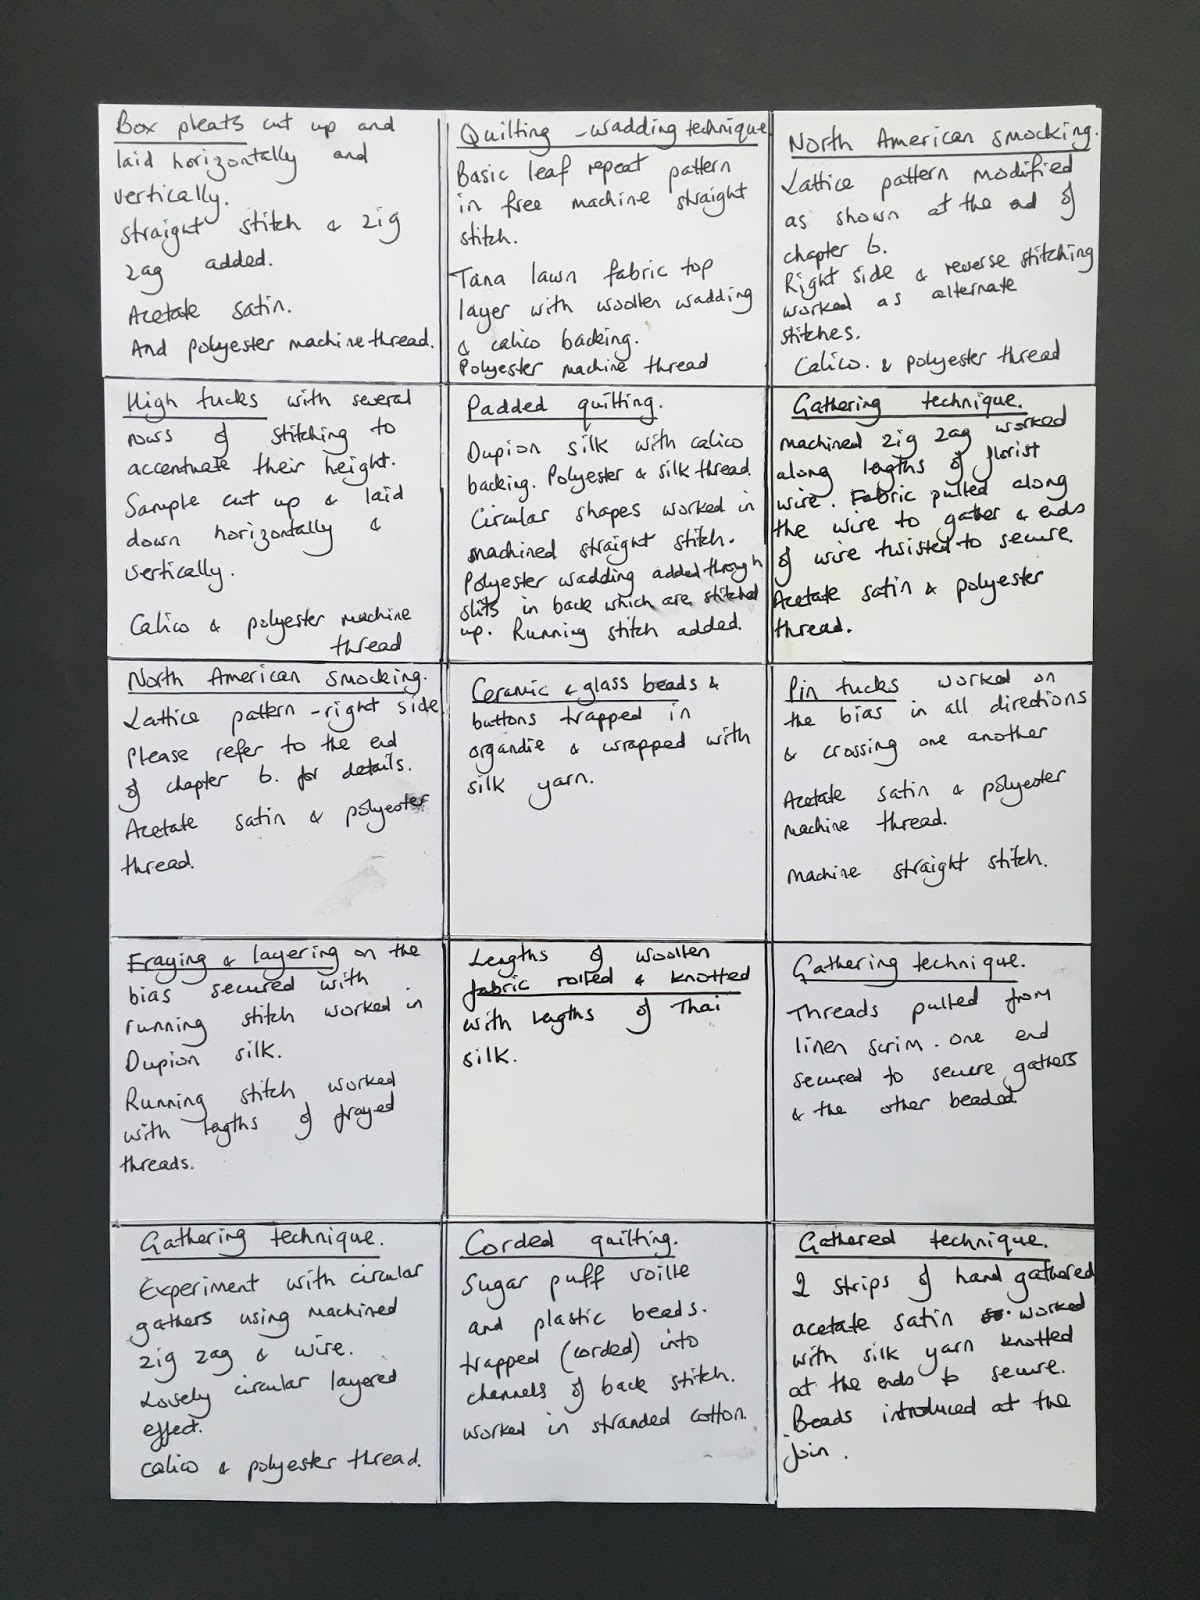
The brief was to use plain white fabrics, a black or white background and a toning sewing thread to produce a set of samples measuring about 4 x 4cms arranged in a grid like fashion whilst paying attention to the edges which would add to the finished effect.
The idea was to make as many differing contrasting squares as I desired as long as they felt different. 

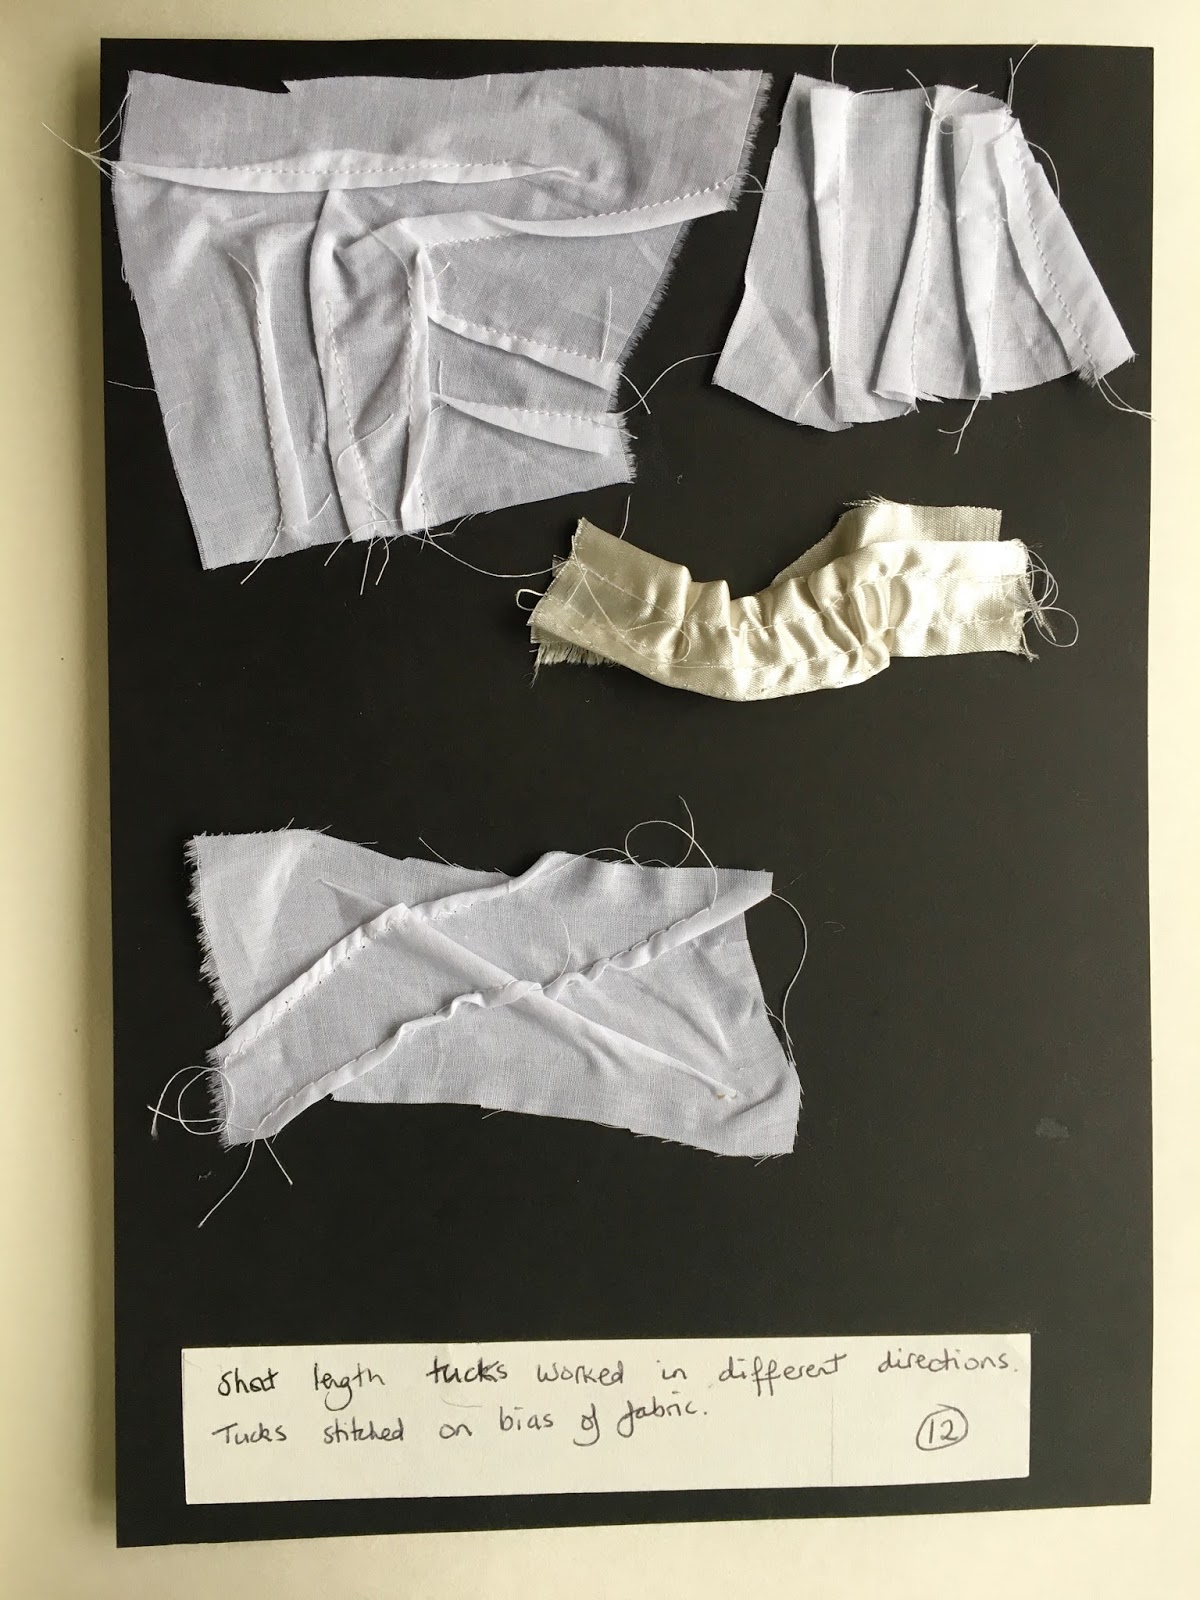
This meant that a range of textures would need to be worked out by choosing suitable techniques, fabrics and stitchery. I've used the samples worked in previous chapters to guide me whilst bearing in mind the research images gathered in chapter 1.
The techniques and fabrics I've chosen demonstrate how these characteristics can be achieved through manipulation whilst paying attention to the individual differences of each.
I wanted to make the most of the interesting shadows and reflections cast by the samples and to achieve this I decided to use a white background and paid attention to the edges of each square and the spaces between them to add to the finished effect.

I've arranged the squares to try and promote the best contrasts for touching and feeling namely hard or soft, high or low, smooth or ridged / spiky  and experimented with a video  taking a close up journey over the surfaces of each one to try and evoke a sense of how they might feel.


                                                Finished sampler with written guide below:


Tuesday 19 December 2017

Further experiments with North American Smocking for chapter 6

My last set of samples of North American smocking revealed an interesting pattern on the reverse which seemed to resemble patterns on the Ivy Clad Ditch research photos in chapter 1.

Sian suggested I try making samples combining the front and reverse patterns on one side of the fabric. Great minds think alike as these had been my thoughts too! So glad Sian suggested it.

These are my trials:
Lattice patterning:
Sample 1 shows two rows of reverse and two rows of the right side stitching
Sample 2 shows alternate rows of reverse and right side stitching


More lattice patterning:
Sample 3: Alternate stitching along the rows. I worked a stitch and then flipped it over to work the next on the other side.
Sample 4 : An alternate simplified  form of lattice stitch 
Lozenge patterning:
Sample 5: Lozenge pattern [right side]
Sample 6: Lozenge pattern - alternate rows of right side and reverse side stitching.


Lozenge stitch reverse:


I thought it would be fun to lay some of these samples against the original research in chapter 1


I enjoyed this and can see interesting tonal shapes and patterns which may be wonderful in later stages when I start to pull ideas together. I'm thinking ahead to stitching and maybe introducing some needle weaving along the threads on the reverse sides to add texture at a later stage.


Wednesday 15 November 2017

chapter six post script

I came across some beautiful North American smocking which reminded me of the ditches and ridges in my research pics in ch 1 and 3.
I had a go and very pleased


And the reverse of the lattice pattern which reminds me of my ivy clad ditch in ch 3


To await development................!

Chapter 6. Tucks and pleats and gathers

This chapters is all about tucks, pleats and gathers and the many ways in which we can experiment with different ways of tucking, pleating and gathering a piece of fabric.

A tuck is stitched along it's length
A pleat is pressed into shape
A gather is pulled along a thread, stick or ribbon.

The following pages show how I have investigated these methods.
I have so enjoyed this chapter - so many surprises and gorgeous effects as I worked my way through the chapter's contents. So inspiring. Thank you Sian!
I've used a wide variety of fabrics and threads to demonstrate how different textural and tonal effects
can be achieved and tried to use my imagination to create a diverse set of samples.


Tucks first:
Looking at various methods, each method is labelled and spans over 13 samples:


This sample shows a selection of tuck methods combined every which way!


Gathering techniques:

In experimenting with gathering techniques I've used a variety of hand and machine techniques to achieve many effects. I haven't, however, been able to find a gathering or pleating machine for this section but hopefully this selection will suffice.


A selection of gathering techniques attached to a background fabric and worked to show textural and tonal effects:


Below are samples whereby different weights of fabric have been joined and gathered and then fashioned into a circular shape. I love this sample and feel it is beautiful inn it's own right.


Following on from the gathering methods we now move on to the use of stitching both by hand and machine to demonstrate the holding and decoration of gathers.
The next samples look at smocking firstly on scrim and then a more delicate tana lawn. I especially enjoyed working the irregular cable stitch on sample b.whilst thinking of the ridges and channels in the ditches in chapters 1 and 3.


A variety of fabrics stitched together and gathered before being placed on a separate background fabric and then decorated with enhancing machined satin stitch


Further gathering methods:


The use of buttons, beads, shells etc to add more delight!


I have so enjoyed this chapter and can't wait for the next to take these techniques further.

I have another image to add showing North American smocking but will have to postscript as it has failed to download


Wednesday 20 September 2017

Chapter 5 Quilting techniques


Quilting techniques involve layers of fabric with padding  placed below the top surface, stitching is added to hold the layers in place. This chapter looks at the wadded, shaped, padded and corded methods of quilting.

I've worked with some traditional methods of quilting in the past but have been fascinated by the experimental samples with unconventional fillings and padding used here.

I've uploaded my sketchbook pages starting with the wadded technique. I've started by using conventional methods and then moved onto more experimental materials in later samples .

Wadded method:


 I used the strips of fabric at random as wadding, I love the unfinished edges.


You can just make out the small circular shapes of the waste from my paper hole puncher here!


I think this feathered filling below is my favourite, I love the swirling effect of the feathers and the soft tonal qualities.
Sample 10, however, is taken from another piece of work completed some time ago but I felt it could be really useful - especially as a possible interpretation of the 'ivy clad ditch' in chapter 3 sample 5.


Shaped quilting:

This involves two layers of fabric with the shapes placed upon the backing fabric [ I used a little glue to keep them in place] before adding the top layer of fabric and carefully adding the stitching.

We were encouraged to try out different top fabrics and fillings for interesting results, especially see through top layers revealing the unusual fillings beneath!


Padded quilting:

 Padded quilting is comprised of a top and backing fabric which are stitched together first and the padding added afterwards through the back layer. To achieve this a slit is made within the stitched shape, the padding inserted and the slit slip stitched back in place.
It was fun trying out various shapes and unusual paddings. 


This piece of trapunto was completed previously, I apologise for the pink but I thought it was a lovely example.


Corded quilting

I tried some by hand - using back stitch either side of the cord, I especially love the effect of the sugar puff voille and the beads!  The others are by machine using straight stitch and a double needle was used for sample 4 which seemed to have a life of its own as it sprung to life! The backs views were good too especially sample 1!


Back views:


Wednesday 23 August 2017

Back to chapter 3 module 5 - some amendments!

I hadn't felt satisfied with the paper workings for ivy roots sample 7. so decided to have another go.

I wanted to find a way of representing the hairy texture of the ivy roots so I tore and ripped strips of cartridge paper and then distressed the surfaces with with the point of my old and blunt embroidery scissors before pushing and manipulating the strips onto a glued surface.

I used a white background to exploit the shadows created by sunlight coming from the right. The ivy leaves have a different texture and a waxy / shiny surface. I used scrunched up tracing and grease proof paper papers for this. The creases leave white marks which could represent the veins on the leaves.


Also Sian suggested some more work to explore further my paper workings for sample 5 - ivy clad ditch.
She asked if using smaller scale leaves would have inspired a different response.
I realised I needed a denser patterning with repeated shapes and negative spaces. I'd been too hung up on trying to achieve a too realistic image and need to kick start the right side of my brain into seeing the diverse shapes rather than leaves.

I tried them out on black and white backgrounds to play with the effects of daylight and the shadows created on the latter.
For the two samples below I used tissue paper folded into a concertina, cut into and then spread  out unevenly removing and scattering some of the leaf shapes from their folds. Much happier with these!


I haven't used my sketchbook pages too much in this post as the focus is poor but added this one below to show the concertina workings in top right hand corner and the waxy ivy leaves worked on black and white backgrounds at the bottom of the page.


Monday 21 August 2017

Chapter 4 continued

Having investigated the technical properties of my collection of fabric types in the first part of the chapter I've used knowledge gleaned to produce an experimental collection of edges which have been further developed into decorative bands.
I played around with different strip widths and edging effects depending upon the nature of the fabric. I really enjoyed this piece of work - lots of surprises which were exciting and inspiring!


Mix of natural and man made fabrics - please refer to the chart below


And more:


During my tutorial at Summer School Sian suggested I fray more samples and layer them for added effect. Really love these samples especially the silk muslin - sample 1. So beautiful.
See below:


And then fraying on the bias, layering, gathering and threading: 


Close up:


Some of the samples took on a similarity to my research pages in the first chapter:


Close up: 


Finally I added some layering with strips of man made fabrics slashed or penetrated with a soldering iron:


It was important to observe safety precautions with these samples as melting these fabrics emitted noxious fumes [ I worked in a very well ventilated work space as well as taking care to prop the heat tool up carefelly to prevent accidents.